


So by now you have made it through the whole line up-such an amazing group of ladies right?!!! (In case you are joining the hop without starting from the beginning-go here to Amy Heller's blog) I know I have told Amy a dozen times, but I am so honored to be a part of this awesome group of ladies!! Their creations are far superior to mine, so I feel awful being the last on the list for you all to see! I hope you all enjoy my creations!! :D
I am going to start you all off with the PRIZES!! Elmer's has been extremely generous with their prizes for this hop! We have 4 prize packs to giveaway, with a retail value of over $400 in total!! That is just incredible people!! :D
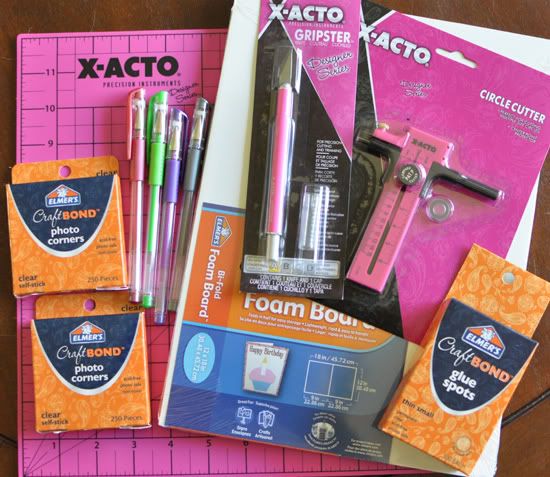
2 Grand Prizes-Two lucky people will receive this prize pack

In EACH of the (2) GRAND PRIZE bundles include:
3 X-ACTO Retract-a-Blade knives
3 CraftBond Extra Strength Glue Sticks
3 CraftBond Tape Runners
3 Mini Bi-fold 9x12 Foam Board packs
1 Painters Markers pack
1 X-ACTO Decorative Edge Scissors pack
1 Circle Cutter
1 X-ACTO Self-Healing Mat
1 Glue Dots pack
2 Photo Corners packs (various colors)
1 Gel Pens pack
1 Tacky Glue bottle
.................................
$140/retail!!
and then there are 2 more prize packs being given away by Amy Heller!
Prize Pack #1
1- XACTO Cutting Mat
1- XACTO Gripster
1- XACTO Circle Cutter
1- Elmer's Foam Board Pack
2- Elmer's Photo Corners
1- Elmer's Glue Spots
4 Gel Pens
.................................
Approx. $50/retail (US)
Prize Pack #2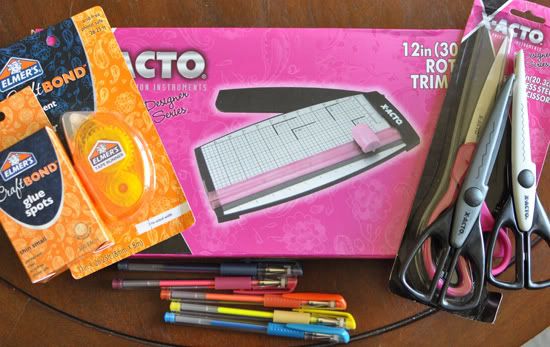
1- XACTO RotaryTrimmer
1- XACTO Scissors
2- XACTO Decorative Scissors
1- Elmer's Glue Spots
1- Elmer's Craft Bond
5 Gel Pens
.................................
Approx. $50/retail (US)
Here is how to possibly win one of these for yourself: Hop through all ten blogs on the hop (starting with Amy Heller's blog) and leave a comment on each blog. You have until 11:30PM, PDT (West Coast Time) on Sunday to comment- that gives you all weekend! :D Winners will be chosen and posted on Amy's blog on Tuesday. :) Super duper easy right?
Now to show you my projects!!
I will first start with some barrettes and clips I made for both the girls and myself. :D Please note that I am really really (REALLY) late to the 'make-your-own-flower-hairthingy-and-clips' bandwagon. So these are my first attempts at it. :D I had a blast making them! But somehow it slipped my mind how INSANE my eldest Creedence is, so all the pictures of her are crazy and super blurry. This child is wild I tell ya!! But I think the only reason the pictures of Aurelia turned is because, bless her heart, she is stuck in her swing! Laugh! Won't be long though before this baby is on the move! Ok back to the projects....
This is the best picture I got this headband I made. :P But I love how this looks!!! :D I used my bottle of Elmer's Tacky Glue for this project, and as long as you let it completely dry then it works great!! The top part of the band (that goes across the top of the head) is actually 1 inch cotton seam binding that I sealed closed by applying a line of the glue on the inside and simply folded the two sides together. The bottom part (which is underneath your hair at the back of your neck) is some elastic ribbon, just enough to make the headband taut on the head. Glue these two pieces of ribbon together and you have your head band! The flower was really easy. I made it out of felt. There are tons of tutorials on how to make these rolled up felt flowers online, but if you would like a link to one just let me know in the comments and I will find one for you. :D On top of the flower I glued a bow and a yellow flower brad (which adhered beautifully!).
These next photos are ones that I was talking about. Creedence is just moving waaaay too much and I am not a good photographer so I don't know how to not get them blurry. :P I actually have no clue how to use the camera except in automatic. Laugh! These are simply just felt circles cut out and then a brad through them. I used some aligator hair clips and used the Tacky Glue again to ahere the ribbon on. (I can do a tutorial for this if you would like! It is so easy anyone could do it!) This isn't an instant drying glue so the ribbon did take some holding onto for it to dry together but it didn't take long. :D And now I have customized hair clips for the girls!
Here is the munchkin playing peek-a-boo with me while I am trying to get her picture!
Her mouth here is completely covered in chocolate milk! My daughter is one of those that can not help making a mess no matter what she does.
Here is Aurelia with her barrette! It matches her outfit :D Probably the only time this baby has worn coordinating stuff since she was born! Laugh!

And because I can't do this blog post without having a picture of this baby looking at the camera!

Here is a side view of the barrettes so that you can see them on the clips.
And here are two clips that I made for my sweaters. :D I almost ALWAYS (even when I sleep) wear a little plain silver barrette in my hair to help keep my bangs out of my face, but rarely do I wear a decorated barrette in my hair. So seeing as I wear sweaters all the time, I thought I might make a couple little things to dress them up once in a while! One has a clip back and the other a pin. Both are adhered, again, with the Tacky Glue! (Love this stuff!)
And because the munchkin has to be in EVERY PHOTO I take now a days, she just couldn't resist putting her hand in there!
Next is a layout I made about all my favorite quotes from Pinterest lately. :D This was an enjoyable layout to make! It is a two pager (8.5x11 double). I products I used for this project are: Elmer's Tacky Glue, Craftbond Permanent Tape Runner, and Craftbond Glue Spots. They worked beautifully for my scrapbooking!! The glue spots are super thin (so no lifted off the page effect when you are not wanting it), the tape runner is so smooth and easy to use (and quiet! I used to have a tape runner when I first started scrapbooking that made a clicking noise the entire time you ran it-and when you have a little one in the same room as you in the dead of night when you are trying to craft-quiet means a lot!! :D), and my fav of all the Tacky glue works fabulously! What I love most about this glue is that it is thick, but it doesn't warp your paper like other glues I have found. And I am a wet glue girl, so I have used MANY a bottle of wet glue since I started scrappin. :D So this glue for me is a keeper.
And lastly, I have here a project that I have wanted to do for a VERY long time!!! Ever since I first saw these frames from Sassafras Lass I knew they would be awesome for this! So I finally did it! Here is our little family portrait hanging for the living room! Doesn't go at all with our furniture or the colors anywhere in our house, but I LOVE IT!!! I can't wait to get it hanging in it own designated spot in the living room! (for this picture I just hung it on the pan rack in the kitchen area so I could get a picture next to the sliding glass door) I used all the same glues as the above project, and again they worked like magic!
So there you have it!! All my projects! I had a few things in my box that did not get used, though I have intentions to do so. There was a circle cutter (something I have NEVER owned) so I was really intimidated by it. Circles is not something I have used much on my layouts because I would have always had to hand cut them out, and they look all wonky so I just avoided it. But now that I have the cutter I am going to put it to good use. I tried to use it for these projects but kept messing up (user malfunction! Laugh!), so I need to work more on my technique with it and then I know I will get it right eventually! :D And the other thing I wanted to use was the Foam Board! I could not for the life of me figure out what to do with this, until last night an idea came to me! LOL! A little too late huh? So I have plans on putting that together this week and hopefully will have it done soon!
Again Everyone I am so so sorry that this did not go up when it was supposed to! I have never had a post just get eaten up like that before! :( All your comments on my other posts will all be counted, so no need to recomment unless you really would like to! Thanks so much!!!
Real quick I wanted to say a HUGE Thank you to Amy Heller!!! She is the best, and I really had a blast with this Craft and Tell! And also a HUGE HUGE THANK YOU to Elmer's and XACTO for making all this possible!!
Take care everyone! And good luck with the hop!