


 Posts
Posts


I think I have finished my blog! :D I did the header last night (took me til 1:30 am!), and I really like how it turned out! :D The picture of me in the header was actually taken by Creedence from her carseat in the backseat of the truck! She loves to take pictures sooo much! :P
Anyway, let me know what you think! I will get all the credits up for the digi kits I used tomorrow. Thanks so much for being patient while I got it all together!
~Amy
Sunday, November 14, 2010

Saturday, November 13, 2010
Shades of the Same
Hi Everyone!! So did you all have fun doing the blog hop?! It was pretty awesome huh? I had a blast just going around looking at all the amazing tags my fellow designers made! They blow me away! It truly is a talented and diverse team-and I am so lucky to be working with them! Great group of gals. :D
Well today I am going to share with you an ATC project I did a little bit ago for a challenge over at Noel Mignon. The challenge was to use as many shades as you wanted of one color, but only ONE color!! (I assumed that the picture elements you chose could be whatever colors, so that is what I went with) The color I chose (and this may be cheating :P) was a creamy white. :D So everything on here is from a stark white to a dirty kind of malty cream color. Absolutely had a blast doing this!
I used these gorgeous (free!) images, found at this blog, for the little pops of color on the ATCs. Everything else was from my stash or things around the house that were the color I needed. :D You are probably wondering why there are three empty spaces in my Printer's Tray, and that would be because I ran out of time. :P But I fully intend on finishing the last three. As the other 9 were a ton of fun to do! :D
 Here are close ups of all the ATCs I made. I will list all the products used after each one.


 Supplies: Paper-Basic Grey Basics White "Census", Basic Grey Indian Summer Brown Doily (backside of it), vintage paper from stash; Embellishments-Hambly Doily rubon in Cream, Hambly Lace Overlay in cream, Making Memories Vintage Findings Word strip (love), Making Memories I Do brad, Prima Velvet Rose Leaf in white, Prima Flower Centers in white, Prima Donna Downey Canvas (backside of it), Prima Trellis Rose in White, Basic Grey Basics White sticker trim, Elle's Studio journaling tag (punched with Rose leaf); Tools-Martha Stewart Rose Leaf punch, Martha Stewart Starburst punch, Marvy 1 1/2 in Scallop circle punch
Well today I am going to share with you an ATC project I did a little bit ago for a challenge over at Noel Mignon. The challenge was to use as many shades as you wanted of one color, but only ONE color!! (I assumed that the picture elements you chose could be whatever colors, so that is what I went with) The color I chose (and this may be cheating :P) was a creamy white. :D So everything on here is from a stark white to a dirty kind of malty cream color. Absolutely had a blast doing this!
I used these gorgeous (free!) images, found at this blog, for the little pops of color on the ATCs. Everything else was from my stash or things around the house that were the color I needed. :D You are probably wondering why there are three empty spaces in my Printer's Tray, and that would be because I ran out of time. :P But I fully intend on finishing the last three. As the other 9 were a ton of fun to do! :D
Here are close ups of all the ATCs I made. I will list all the products used after each one. Supplies: Paper-Basic Grey Nook and Pantry "Cornbread", Cosmo Cricket Coredinations cardstock (punched leaf), vintage book paper and glassine envelope, organic paper from my stash; Embellishments-Making Memories Vintage Findings Large Baby kit (safety pin), Making Memories Vintage Findings Velvet Flowers, tulle from Michaels, Autumn Leaves button; Tools-Martha Stewart Starburst punch, Martha Stewart Rose Leaf punch
Supplies: Paper-Crate Paper Pink Plum "Very Berry", Basic Grey Nook and Pantry "Waffles", Basic Grey Indian Summer Brown Doily (backside of it), vintage book paper; Embellishments-Elle's Studio Journaling Tag (punched leaf), Hambly Stitches rubon in Cream, Prima La Fleur Boheme flower (little cream flower taken off of larger flower), Prima Velvet Rose Leaf in white, crepe paper and twine from my vintage stash; Tools-Martha Stewart Starburst punch, Martha Stewart Rose Leaf punch
Supplies: Paper-October Afternoon Night Light "Katie", organic paper from stash; Embellishments-Ivory Jute twine from Studio Calico, Making Memories Vintage Findings Mini Nature kit, Hambly Doilies rub in Cream
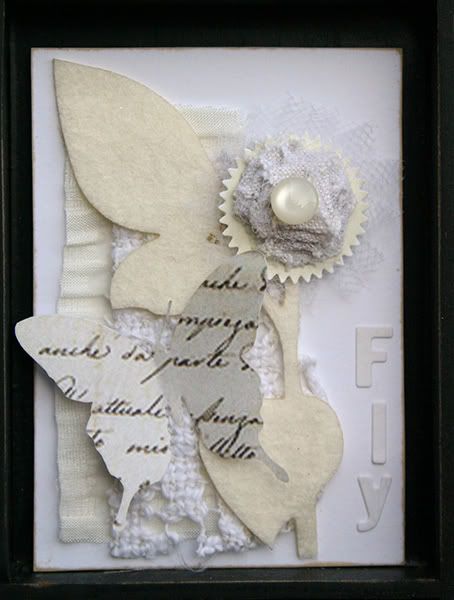
Supplies: Paper-Cosmo Cricket Honey Pie; Embellishments-Elle's Studio Journaling tag (punched with startburst), Tulle/Fabric/Lace all from my vintage stash, Prima Felt Stem in Cream, Button from Beverly's Crafts, Basic Grey Manilla Micro Monograms stickers; Tools-Martha Stewart starburst punch
Supplies: Paper-Bazzill Swiss Dot white cardstock, vintage book paper, organic paper from stash; Embellishements-Making Memories Vintage Findings Large Baby kit, Making Memories Vintage Findings Silver buttons, Girl's Paperie Sticker Market (wish sticker), Hambly Birdcage overlay in Cream, K and Co Handmade vintage frame sticker, Bird bead from Beverly Crafts; Tools-Marvy 1 1/2 in Scallop circle punch
Supplies: Paper-Cosmo Cricket Earth Love 6x6 mini deck, Basic Grey Indian Summer Brown Doily (backside of it), vintage book paper and glassine envelope; Embellishments-Hambly Birdcage Overlay in Cream, Prima Calcutta leaf in Oatmeal, Prima La Fleur Boheme Flower (little cream flower taken off of larger flower), K and Co Handmade Frame sticker, Maya Road Calendar rub in white, string from sweater extra; Tools-Martha Stewart Starburst punch, Martha Stewart Rose Leaf punch, Marvy 1 1/2 in Scallop circle punch
Supplies: Paper-Bazzill Cardstock, Basic Grey Nook and Pantry "Cornbread", Basic Grey Indian Summer Brown Doily (backside of it), vintage book paper; Embellishments-Sassafras Lass deer sticker backing, Pink Paislee Velvet ruffled trim, Studio Calico Ivory Jute twine, Making Memories Vintage Findings Word strip (dream), Autumn Leaves button, Hambly Doily rubon in Cream, Snow glitter from Michael's; Tools-Martha Stewart Star Confetti punch, Martha Stewart Starburst punch
Supplies: Paper-October Afternoon Cherry Hill "Tea Towel", Basic Grey Nook and Pantry Doily in Yellow/Cream, vintage book paper; Embellishments-Webster's Pages lace, Making Memories Vintage Findings Mini Girl kit; Tools-Martha Stewart 3-in-1 Butterfly punch
Supplies: Paper-Basic Grey Basics White "Census", Basic Grey Indian Summer Brown Doily (backside of it), vintage paper from stash; Embellishments-Hambly Doily rubon in Cream, Hambly Lace Overlay in cream, Making Memories Vintage Findings Word strip (love), Making Memories I Do brad, Prima Velvet Rose Leaf in white, Prima Flower Centers in white, Prima Donna Downey Canvas (backside of it), Prima Trellis Rose in White, Basic Grey Basics White sticker trim, Elle's Studio journaling tag (punched with Rose leaf); Tools-Martha Stewart Rose Leaf punch, Martha Stewart Starburst punch, Marvy 1 1/2 in Scallop circle punchOk wow. Could that have been any longer?! LOL! I had no idea it would take such a long post to get all that typed up :P One thing I wanted to share with you about this project (and of my previous ATC project), is that none of the ATCs are fixed into the Printer's Tray. I use that sticky tack whatever stuff you can get from the Office Supply store to keep them in, but are super easy to remove when you want to change out the display. :D That way I don't have to keep buying more trays! But what I am planning on doing with the ATCs when they come out-as I don't want to just put them in a box or something never to be seen again-instead I am going to make banners out of them and string them up! :D At least I think this will work. :P I haven't tried it yet, but I think it should be pretty easy. I will just adhere the string to the back of the ATC (near the top) and that should be good. Have any of you ever tried this? If so any good pointers would be MUCH appreciated! :D
Well that is all I have for right now. Stay tuned real soon for more scrappy stuff and a baby bump update! :D
Take care everyone!
~Amy
Monday, November 8, 2010
Crate Paper Blog Hop!
Good Morning!! Well another post did not make it up this weekend before today, but that is ok because I just about finished redoing my blog instead! :D I just want to redo the header, and then it should be done. Soo happy for that! (Although I am not sure how easy the header will be :P) Anyway, fun stuff for you today!! Crate Paper is having a blog hop! Woohoo! Rules are pretty simple-just grab the letter you see to your left at the top of my sidebar, as you need this letter to be able to spell out the phrase for the blog hop! After you get my letter, mosey on back to the Crate Paper blog to find out who's blog you go see next! :D Good Luck!! (And if you want to see what I created for the blog hop-then just keep scrollin down. :D)
 All of us over at Crate Paper created a tag about what we are thankful for in our lives. I am most thankful for my family. I can not imagine a single moment without them, and am so blessed to be able to have them in my life! :D Here is my tag:

 I decided to use a Melissa Frances scallop tag as the base. I did lots (and LOTS) of layering on the outside of the tag. I used a mix of School Spirit and Restoration papers, along with embellishments from Restoration, and two older lines: Mia and Lemon Grass. The first thing I did was make the 'cover' for the tag sleeve. I did this by simply wrapping my paper around the back of the sleeve. (I don't do cards or tags very often so I really didn't think this one through too much when it came to the back of the project :P) Next time I will be planning thing differently so that it is a bit cleaner on the back. :D Laugh.
Anyway, I used School Spirit "Homeroom" as the main paper for the sleeve cover. I used a little sliver of Restoration "Doilies" on both the top and bottom, and then finally the Restoration Border Stickers brown scallop below the "Doilies" paper-just barely sticking out. The actual tag itself was really easy-I just cut the Restoration "Lace" paper to the tag size, cut out a grade card from the School Spirit "Grade Card" paper, and lined along the card the selvage trim edges of paper from School Spirit "Ruler", School Spirit "Study Hall", Restoration "Slipcover" and Restoration "Flea Market". Then I punched out some butterflies from the Restoration "Doilies" paper, and placed them on both the tag sleeve and the tag insert.
The truly more detailed layering that I did are the two main elements on the tag sleeve. The chipboard element (pictured below) was made with the green doily chipboard piece from the Restoration 12x12 accents sheet. On top of that I used a punch from vintage paper,
which was covered with the charcoal grey doily rub from the Restoration rubons sheet. Even further on top of that I used a punch from the Restoration "Heirloom" paper, then I layered some ivory jute (tried to make it look like a decent bow but I'll be honest-it kind of failed! LOL! Oh well. What are you gonna do ya know?) and a heart punched out of the Restoration "Lace" paper. I accented the heart punch with part of a rub from the Restoration rubons sheet. This turned out a lot more subtle than I thought it would, but I like that a little better.
 All of us over at Crate Paper created a tag about what we are thankful for in our lives. I am most thankful for my family. I can not imagine a single moment without them, and am so blessed to be able to have them in my life! :D Here is my tag:I decided to use a Melissa Frances scallop tag as the base. I did lots (and LOTS) of layering on the outside of the tag. I used a mix of School Spirit and Restoration papers, along with embellishments from Restoration, and two older lines: Mia and Lemon Grass. The first thing I did was make the 'cover' for the tag sleeve. I did this by simply wrapping my paper around the back of the sleeve. (I don't do cards or tags very often so I really didn't think this one through too much when it came to the back of the project :P) Next time I will be planning thing differently so that it is a bit cleaner on the back. :D Laugh.
Anyway, I used School Spirit "Homeroom" as the main paper for the sleeve cover. I used a little sliver of Restoration "Doilies" on both the top and bottom, and then finally the Restoration Border Stickers brown scallop below the "Doilies" paper-just barely sticking out. The actual tag itself was really easy-I just cut the Restoration "Lace" paper to the tag size, cut out a grade card from the School Spirit "Grade Card" paper, and lined along the card the selvage trim edges of paper from School Spirit "Ruler", School Spirit "Study Hall", Restoration "Slipcover" and Restoration "Flea Market". Then I punched out some butterflies from the Restoration "Doilies" paper, and placed them on both the tag sleeve and the tag insert.
The truly more detailed layering that I did are the two main elements on the tag sleeve. The chipboard element (pictured below) was made with the green doily chipboard piece from the Restoration 12x12 accents sheet. On top of that I used a punch from vintage paper,
which was covered with the charcoal grey doily rub from the Restoration rubons sheet. Even further on top of that I used a punch from the Restoration "Heirloom" paper, then I layered some ivory jute (tried to make it look like a decent bow but I'll be honest-it kind of failed! LOL! Oh well. What are you gonna do ya know?) and a heart punched out of the Restoration "Lace" paper. I accented the heart punch with part of a rub from the Restoration rubons sheet. This turned out a lot more subtle than I thought it would, but I like that a little better.
The other element is almost as many steps as the first one, but somehow seems a lot easier to tell! :D The main thing I used for this element were the Restoration Phrase stickers. I first took the 'Sweet Little Thing' sticker and covered the middle with postmarked rub from the Restoration rubons sheet. I knew this would just barely show up on both the top and bottom of the element, but I was only wanting a little bit of an accent on it. Next sticker to go on was the 'mind your Ps and Qs' sticker. After that I took the 'much thanks' sticker (the sentiment for the front of my tag sleeve) and stuck it to a sheet of vintage paper. I then used my 'Postal' decorative scissors and trimmed around the edges of the sticker. And finally, it made it's way home by being stuck to the front of the sticker stack I had just made. Really pretty easy. :D


Well that is all I have for you today-I'll be back soon with more scrappy stuff to share! Take care!
~Amy
Thursday, November 4, 2010
.....
And just like that...*Poof!* She is gone again! :P I've got mad blog-neglect skills.
Next up is a new LO I finished using the Mitten Weather line. I really do like this line a lot, but I for some reason just have a hard time scrapping winter/Christmas themed projects, and have them turn out looking decent. :P I don't know what it is, but they just never turn out the way I wanted. This LO turned out super plain jane to me. :P But the pics of Cree make me smile so I am still somewhat happy with it. :D I decided to tone-down that background paper by giving it a white-wash with watered down gesso. Everything else I just cut into squares, and some of them I punched the middle out with one of my fav winter punches from Martha Stewart, then backed those pieces with a different patterned paper. Once everything was all lined up, then I ran it through my sewing machine. Some of the pieces turned out a little wonky cause they weren't so securely fastened, but it is pretty subtle. Anyway, here it is. :D


 Supplies: Paper-Cosmo Cricket Mitten Weather collection (all papers, including journaling cards and borders); Embellishments-Cosmo Cricket Mitten Weather 12x12 Ready Set Chip, Cosmo Cricket Ready Set Chip Glittered Sweet Sparkle chipboard alpha, American Crafts Lullaby Thickers in Charcoal, Kaisercraft Pearls, Ivory Jute twine from Studio Calico; Tools-Martha Stewart Alpine snowflake punch, Martha Stewart Arctic snowflake punch, Martha Stewart Star Confetti punch, Claudine Hellmuth Gesso


Totally was not my intention, but it happened. I still haven't finished redoing my blog either. I began working on it. Switched it to just a 2 column, but now that I am looking at again (weeks later) I am really not liking that. So I think switching back to 3 columns is a must. Which means I have to get back into the HTML, which I hate! LOL! Who else here can't stand that stuff?! It's total non-sense jibberish! Anyway-I am still working on the blog header too. Picked up this digi kit from Kitschy Digitals, and am having a blast working with it! I had been waiting for that kit to come out for a while, so I am stoked that I can finally use it for my blog banner. :D That will hopefully be up next week.
Got some scrappy stuff to share with you today. :D I was hoping to get all my Halloween stuff done before Halloween, but I only have parts of several projects done. LOL! I guess those will all just have to go up for us to enjoy in November! :D I will share all of those when I am done, but until then I have a few Cosmo shares.
Post went up last Saturday over at Cosmo Cricket-it was Wendy Sue's turn to do the DT challenge, and she chose a gorgeous page from a Pottery Barn catalog. Love it! So here is what I did for the challenge:


Next up is a new LO I finished using the Mitten Weather line. I really do like this line a lot, but I for some reason just have a hard time scrapping winter/Christmas themed projects, and have them turn out looking decent. :P I don't know what it is, but they just never turn out the way I wanted. This LO turned out super plain jane to me. :P But the pics of Cree make me smile so I am still somewhat happy with it. :D I decided to tone-down that background paper by giving it a white-wash with watered down gesso. Everything else I just cut into squares, and some of them I punched the middle out with one of my fav winter punches from Martha Stewart, then backed those pieces with a different patterned paper. Once everything was all lined up, then I ran it through my sewing machine. Some of the pieces turned out a little wonky cause they weren't so securely fastened, but it is pretty subtle. Anyway, here it is. :D
Supplies: Paper-Cosmo Cricket Mitten Weather collection (all papers, including journaling cards and borders); Embellishments-Cosmo Cricket Mitten Weather 12x12 Ready Set Chip, Cosmo Cricket Ready Set Chip Glittered Sweet Sparkle chipboard alpha, American Crafts Lullaby Thickers in Charcoal, Kaisercraft Pearls, Ivory Jute twine from Studio Calico; Tools-Martha Stewart Alpine snowflake punch, Martha Stewart Arctic snowflake punch, Martha Stewart Star Confetti punch, Claudine Hellmuth GessoThis last one I will share is actually pretty old! :P it went up on the Cosmo blog month's ago, but never made it to my own blog! LOL! But it is one of my all time favs. I really like how this one turned out! I don't usually do circles on my blog (I am not sure why, they just don't come to mind when designing), but they really made this LO I think. Lots of distressing and inking, and some machine and hand sewing. And I love that pic of Cree so this LO just makes me happy. :D
Here are some close ups of the hidden journaling tag behind the picture. I still have to put the journaling on there. :P Details, details.


Supplies: Paper-Cosmo Cricket Joy Ride collection (pretty much every paper in the pack is on this LO somewhere), Cosmo Cricket Early Bird 'Ribbon Sandwich', vintage book paper; Embellishments-Cosmo Cricket Joy Rid cardstock stickers, Cosmo Cricket Tiny Type black stickers, Cosmo Cricket Joy Ride 12x12 Ready Set Chip shapes, tulle from Michael's Crafts, Ivory Jute twine from Studio Calico, vintage lace; Tools-Martha Stewart 3-in-1 Butterfly punch, Martha Stewart scalloped 1 in circle punch, Marvy 1 1/2 in scallop circle punch, Martha Stewart Chrysanthemum punch, Tim Holtz Antique Linen distress ink

Ok so I have a lot of catching up to do still!! LOL! I am going to be finalizing my blog this weekend, as there is something really fun happening on Monday that you all will be able to be a part of! :D Check back on Monday for the details on that. I am going to try and get one more post in before the end of the weekend, but we will see, as it is a busy weekend for me! Lots of scrapping to be done!
Hope everyone is well! Take care!
~Amy
Subscribe to:
Posts (Atom)


